
 Highlights
Index 2011-09: Eleven YouTube Videos for polymer clay tutorials:
Finishing up on the Kai-leaf pendant, clayshaper face, wet-sanding,
vat-o-finish, corn starch curing, deskewer beads, recycle skewers, leopard
spot tube beads. Highlights
Index 2011-09: Eleven YouTube Videos for polymer clay tutorials:
Finishing up on the Kai-leaf pendant, clayshaper face, wet-sanding,
vat-o-finish, corn starch curing, deskewer beads, recycle skewers, leopard
spot tube beads. |
||
|
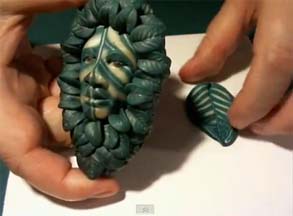
9-3-11-Leaf Cane Kai Pendant Finish Part 1 Finishing the Leaf Cane Kai pendant: This is part 1 of I don’t know how many parts because, as you know I ain’t got no plan. In this video I recommend reducing leaf canes into a cone shape to get different sized leaves when you slice the cane. I show how to form the leaves, again. I put a back on the pendant with a half dozen large leaf slices. The next video will be attaching a number of these 3D formed leaves to the leaf cane Kai pendant.
|
||
|
9-3-11-Leaf Cane Kai Pendant Finish Part 2 Using a “Natasha” bead for where the cord will go through on the pendant and then surrounding the Leaf Cane Kai pendant face with leaves. Discussing why different size leaves make for a more natural look rather than leaves of all the same size. Musing on how the life of the artist is one percent excitement and 99 percent tedium. While putting the leaves in place I muse on how people don’t realize how many steps are involved in creating art, but if they want to learn my tutorials are free and so is CITY-o-Clay at Yahoo Groups where the COCModSquad and I hold hands of anyone who wants to learn how to get a grip on their clay.
|
||
|
9-3-11-Leaf Cane Kai Pendant Finish Part 3 The third and last part of the finish of Leaf Cane Kai pendant and the chop and toss beads that went before him. Tricks shown: how to “fill the gaps” in the multitude of leaves; how to cover the top of square natashas if they will be between smaller round beads; and how to quickly measure the amount of beads you have for a project, not using a ruler. Trick is I used a ruler to figure how wide my out stretched hand was. Measure your outstretched hand and from the tip of your thumb to the first knuckle. You will have an instant ruler on your body. So now the beads and the pendant will be put in the oven and we’ll be off to the next project.
|
||
|
9-4-11-Leaf Cane Kai Pendant Finish Part 4-Burnt I got distracted doing webwork and Leaf Cane Kai Pendant was in the oven for too long and the pearl got scorched. I’m sharing the truth of it because that’s the easiest thing to do. I’ve burnt enough polymer clay to be able to shrug my shoulders and accept the finished item scorched. It is what it is. I recommend that y’all, whether new clayers or old timers, also take your burnt bits with a bit of good humor. It’s only polymer clay. If it were a real emergency you’d know it. Hah!
|
||
|
9-4-11-Wet-Sanding Some folks may not have seen wet sanding before. One tip: Put liquid dish soap in the water to keep from having the polymer clay adhere to the wet/dry sand paper. Review: how to staple different grit sheets together to make wet sanding easier. Three parts: The 3 cane chop beads. Rectangle/Square beads. Round beads. Are wet sanded slightly differently because of their shapes.
|
||
|
9-5-11-Vat-o-Finish Before we can take the beads off of the skewers we need to give them a finish. Rather than give a liquid finish to each bead individually I keep the beads on the skewers and dunk them in a vat of finish. So the beads are formed, cured, wet sanded, and given a finish, all on the same skewer. The finish I use is a low cost industrial acrylic floor finish that I get by the gallon at a big box store. The benefit to keeping your beads on the skewers throughout the entire process is to protect your mental health. When I have beads that I have to deal with individually, like the snake beads, I can just pull my hair. When a dozen or more beads are on one skewer where they are formed, cured, wet sanded, and finished I can also store them easily and they don’t get mixed up with other beads. When I’m ready to string the beads I can take them off of the skewer.
|
||
|
9-7-11-ClayShaper-Face ClayShapers are tools with rubber or silicon tips of different shapes. Use the big ones to move large mounds of clay and smaller ones to get detail. This video shows the use of the larger ClayShaper to get the general shape of a face and then smaller ClayShapers to sculpt details. I only did the details on half of the face because of time constraints. There are other uses for ClayShapers other than sculpting and I will be making more videos showing their other uses.
|
||
 For
24 hours
people will discuss Climate Change. It is almost 1am PDT and this
conversation will continue for another 16 hours. For
24 hours
people will discuss Climate Change. It is almost 1am PDT and this
conversation will continue for another 16 hours.
WHAT IS THE CLIMATE REALITY PROJECT?Climate change is not your fault for the car you drive, the lights you turn on, or the food you eat. The climate crisis is our problem. Real solutions, systemic solutions, innovative solutions, can only come when we address it together. That’s what The Climate Reality Project will do. Without doubt. Without delay. And with your help. The Climate Reality Project is bringing the facts about the climate crisis into the mainstream and engaging the public in conversation about how to solve it. We help citizens around the world discover the truth and take meaningful steps to bring about change. Founded and chaired by Al Gore, Nobel Laureate and former Vice President of the United States, The Climate Reality Project has more than 5 million members and supporters worldwide. It is guided by one simple truth: The climate crisis is real and we know how to solve it.
|
||
|
9-17-11 Corn Starch Use a bed of corn starch for your polymer clay items that have curved edges, or will be seen from both sides, like bracelets and rings. Polymer clay softens during the heat setting, or curing, process. When it softens it settles on the surface of what it rests upon. If you are using a shiny ceramic tile, the bottom of the clay item will be shiny and flat. This is a problem with items you want to maintain the shape all the way around. Corn starch is one solution to this problem.
|
||
|
9-17-11- De-Skewer Beads There are videos for putting the beads on Bamboo Skewers, for wet sanding, for dunking them in a vat of finish. This is how you get the finished beads off of the skewers. Re-heat them in the oven for 5 minutes at 275F/130C and then pull them off of the skewers. Cover your hands in some protection because those beads are hot. I used a pair of cloth gardening gloves I got at the hardware store. One tip: Keep the beads on the skewers until you’re ready to string them. It makes storage much easier.
|
||
|
09-17-11 Recycle Skewers You don’t have to buy new bamboo skewers once you’ve used them while making beads. Here’s the trick on how to get them ready to be used again. The tip: Sand paper.
|
||
|
9-20-11-Tube Bead with Leopard How to make a tube bead with bamboo skewers using leopard spot cane.
|
||
|
Home
Monthly Highlights Since 8/2003 | The official Clay vendor for |
ComboTutes:
New and old stuff First Three Years - Biz-Archive NJ Archive 1997-1999 |